So I bought another embroidery hoop, intending to do just enough to write the tutorial. Then the holidays came, and I
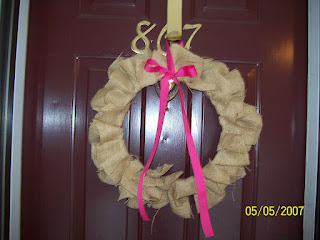
But now that I've taken down my Christmas decorations, my house was looking a bit lonely. So I broke out the glue gun again and make another burlap wreath for the front door. I didn't glue any decorations on this time, so I can change it with the seasons.
I love burlap, and not just because it's so "in". I love how burlap can transform a room, ground a high style, or gussy up some country. It can take so many forms, depending on how you treat it. Burlap also has great texture and is an awesome neutral. It totally fits in my design aesthetic, so I use a lot of it.
So to make the wreath:
One 12" embroidery hoop
1/2 yard of burlap, cut into 8x4 rectangles
loads of hot glue
I used just one circle of the embroidery hoop for the wreath- it's just your circle form.
Take a rectangle of burlap, and pinch/ fold it together to make a "bow" shape.
Squeeze some hot glue on the top of your hoop, and stick the burlap on.
Continue doing this all the way around the wreath. Using a lot of rectangles close together will give you a fluffy wreath, less a shallower one.
Flip the whole thing over so the rectangles are on the bottom.
Using a load more hot glue, squeeze glue onto the exposed side of the hoop, allowing glue to drip onto the top of the hoop. Fold the inner rectangles up and over, hiding the hoop. Secure with more hot glue as necessary.
You can then tie on bows or other embellishments, or glue them on if you don't want to be able to change the look.
Here she is on my front door!


No comments:
Post a Comment
Got something to say? Let me know what you think!