Showing posts with label sewing. Show all posts

Monday, August 15, 2011

Master Bedroom: European Pillow Shams with Flange

I LOVE European shams on beds. They add such a nice finished look without being 10,000 things to take off when you want to go to sleep. (Which is a plus if you have a Mr. in the house. They don't seem to understand decorative very well.) Also, Euro shams are a great size for propping up in bed to read.  So they were a definite must-do for my bedroom makeover.

First, I washed and dried my fabric. If you don't wash before sewing, your piece just became dry clean only.

While I was waiting on the fabric, I did my math.

European pillows are 26" x 26" square. To make sure the pillows were nice and puffy, I wanted them to squish inside my shams. Therefore, my space for my pillow is 24 x 24. I wanted a 3" flange around the outside.

Therefore, my finished dimensions of my sham would be 3" flange + 24" insert size + 3" flange = 30". I added 1/2" on each side for a seam allowance, giving me 31" x 31" for my front piece.

Now, I needed to figure out the back. I wanted an envelope closure that overlapped in the back. I decided on a 2" overlap.

So 3" flange + 12" (half of the insert) + 2" for front hem + 1/2" seam allowance = 17 1/2" wide x the same 31" high.

Then my last piece needed to be 19 1/2" wide to give me a 2" overlap.

Next, I ironed my fabric to get it nice and flat.

Now, to cut my pieces. I have a bit of trouble with straight lines, so I opted to let the fabric do it for me.

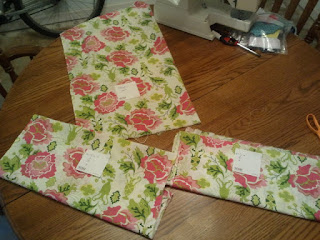
I laid it out flat on my table, measured 31", and cut a small notch.


Rip across to get a 31" tall piece. Measure across the width 31", cut, and rip again to get 31" wide.

This is your front. Label and set aside.

Repeat the measuring and ripping to get your three pieces.


 For both back pieces, fold one edge over 1", and iron.
 Fold over again, and iron again to make a double hem.


Sew along the front with a 3/4" seam allowance to secure the hem. It will look like this from the back:

 Repeat with the second back piece.

 Now it's time to assemble the pillow. Lay the front piece on your table, face up.

Lay the 17 1/2" wide piece face down on top of the front, lining up the edges.

Lay the remaining piece face down on top of the other two, again lining up the edges.

Sew along the edge, using a 1/2" seam allowance.


Turn your sham inside out and press.

Top-stitch all the way around, 3" from the edge to create the flange.

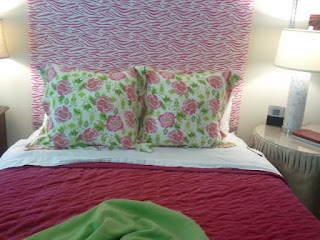
Stuff your pillows in and enjoy!


I love the pop of floral and green they add to the room! 


This method can easily be adapted for any size pillow, just change the sizes based on your insert.

Monday, August 1, 2011

Sewing Project- Lap protector

When I was a baby, I wore cloth diapers. My mom often tells the story of how she kept cuts of rubber sheeting for people to put on their laps so my wet diaper wouldn't stain their outfits. And how my Aunt didn't pay any attention, so I got a big ol' stain on her pink linen pants.


Now many people I know are having babies and choosing to use cloth diapers. Sometimes you just need something waterproof to put between the baby and whatever they happen to be laying on.  To protect your pretty outfit from all those baby fluids. And why shouldn't it be pretty too?

You will need:
Rubber Sheeting cut to 13x18
Fabric cut to 13x18
Double Fold Bias Tape- 1 package
Thread to match
no-sew hem tape.

I used hem tape to attach my fabric to the rubber sheeting- I didn't want this stuff to move around! 

Then, I used a zig-zag stitch to sew around all four edges of the sheeting+ fabric.

Then, I attached the bias tape to finish the edge. I found a great tutorial  here on MADE  for how to attach bias tape.  I used the cheater way, but you are welcome to do it however you want.


Ta-da! A pretty lap protector! Very inexpensive, a great baby shower gift as well.

Obviously, please use caution and supervise your infant. Never leave your baby unattended!

Linking up to:


Wednesday, June 29, 2011

A Little Bit of Fourth of July Decor

If you know me, you know I am perhaps not the most punctual person on the planet. In fact, I'm far from it. I haven't been on time for anything in YEARS! I was even late for my first date with Prince Charming.

So if you know me, it should be no surprise I still have Easter decor out in late June. I keep meaning to take it down, but time gets away from me.

This weekend, I finally made a "summer" wreath for my front door.  I wanted it to layer on top of my burlap wreath, be cheap, and be pretty.

I took the embroidery hoop from my tissue paper wreath, and took all the tissue paper off. Let sit for a week or so while you try to catch up on everything else in your life.

I used two bandannas from the dollar section at Target- my favorite store!

I used my rotary cutter to cut one bandanna  into bias strips 2" wide. 
Then, I sewed along one edge with a loose straight stitch (as big as your machine will go) for several strips.


Then, tie the upper and bobbin thread together on one end of the strip (so your gathers don't unravel. I learned that the hard way.) Then, pull the bobbin thread on the other end so your fabric gathers up a bit. You don't want it all tight and scrunch, just a little ruffly.


When you're done, you'll have a pile like this:
 Sidenote: Don't you just love the concrete floors? Yet another project I've been meaning to do for months.

Now, plug in your glue gun and dust off the embroidery hoop.

Lay a line of glue on the outside edge of the hoop, and stick the thread-gathered end of your ruffle on.


Repeat all the way around the outside, then the inside of the hoop.

I was supposed to be done there. But I didn't like how my ruffles showed the embroidery hoop. It also looked a little skimpy.

So I used the second bandanna worth to cut more bias strips. I did another layer on the outside of the embroidery hoop, gathering the ruffle only a little bit.

Then, since the hoop was STILL showing, I cut a few more bias strips and stitched down the center of them.

Gather those only a little bit, and glue on TOP of the embroidery hoop.


Now it was finally looking "full" as Mom always said. 

 I cut a long bias strip from some red fabric, made a bow, and hot glued it on since I couldn't find any red ribbon.

I wired this on top of my burlap wreath and hung it on my front door!


I love all the ruffly goodness, and how this project only cost me $2!

I hope you all have a safe and Wonderful Fourth!

Monday, May 2, 2011

Burlap Table Skirt

For my bedroom, I made a ruffly burlap table skirt. I was inspired by the beautiful burlap skirts found in Ballard, and the ruffly skirts I saw in Charleston at GDC Home.
DSCN1376

DSCN1250

Mom and I had help from our favorite four-legged paperweight:
First we made our ruffle, ours is 5” plus seam allowances.
DSCN1276
Measure the width of your strip and make a small 1/2” or less snip to mark the spot.  Pull the thread to create a straight line, and cut on this line to get your straight strip.
DSCN1277
DSCN1282
Iron pleats in your hem. You can either do them regularly spaced, or make it random for a more casual look.
DSCN1279
Then sew the pleats down using a zig-zag stitch.
DSCN1284
DSCN1254
DSCN1255
When you’re finished, you will have a long strip that looks like this. In order to ensure you have enough to go around,  you will have to do some math.  You need enough to go around the circumference of your circle (that’s 2piR for your geometry refresher) * 2-3 depending on your pleats.
DSCN1256 DSCN1257
Next, sew widths of the burlap together so that it is at least as wide  as your total tablecloth (drop + top round+ drop) (ignore the ruffle height, so you’ll have some flub room).

DSCN1260
Fold your big ol’ piece of burlap into quarters.
DSCN1261
At the folded corner, pin your tape measure.
DSCN1263
Make your first mark at what I’m going to call point A. Point A will equal the radius of your circle + seam allowance+ seam allowance.
DSCN1265
After you’ve made marks across at Point A, now on to Point B. Point B is the drop of your skirt – the ruffle + seam allowance + hem.
DSCN1269
When you’re done, you will have a piece of burlap with a bunch of pins.
DSCN1270
Now play connect the dots. Gee, isn’t this fun?
  DSCN1275     
Take your top Round (which you cut out along Points A). and pin the ruffle to it.
DSCN1285
Sew using a zig-zag stitch for stability.
DSCN1273
You’ll have a blob like this when you’re finished.
DSCN1287
Next, take the piece  you cut along Points B, and pin it to the other side of your ruffle. Sew this using a zig-zag stitch.
Now, all you have to do is hem, and put it on display!

DSCN1375
Here’s the finished product. I have to give major kudos to Mom and her awesome sewing skills, because my brain just couldn’t figure this out!

Linking up to:
Craft Couture

My Repurposed Life

LinkWithin

Related Posts with Thumbnails