Showing posts with label glue gun. Show all posts

Wednesday, June 29, 2011

A Little Bit of Fourth of July Decor

If you know me, you know I am perhaps not the most punctual person on the planet. In fact, I'm far from it. I haven't been on time for anything in YEARS! I was even late for my first date with Prince Charming.

So if you know me, it should be no surprise I still have Easter decor out in late June. I keep meaning to take it down, but time gets away from me.

This weekend, I finally made a "summer" wreath for my front door.  I wanted it to layer on top of my burlap wreath, be cheap, and be pretty.

I took the embroidery hoop from my tissue paper wreath, and took all the tissue paper off. Let sit for a week or so while you try to catch up on everything else in your life.

I used two bandannas from the dollar section at Target- my favorite store!

I used my rotary cutter to cut one bandanna  into bias strips 2" wide. 
Then, I sewed along one edge with a loose straight stitch (as big as your machine will go) for several strips.


Then, tie the upper and bobbin thread together on one end of the strip (so your gathers don't unravel. I learned that the hard way.) Then, pull the bobbin thread on the other end so your fabric gathers up a bit. You don't want it all tight and scrunch, just a little ruffly.


When you're done, you'll have a pile like this:
 Sidenote: Don't you just love the concrete floors? Yet another project I've been meaning to do for months.

Now, plug in your glue gun and dust off the embroidery hoop.

Lay a line of glue on the outside edge of the hoop, and stick the thread-gathered end of your ruffle on.


Repeat all the way around the outside, then the inside of the hoop.

I was supposed to be done there. But I didn't like how my ruffles showed the embroidery hoop. It also looked a little skimpy.

So I used the second bandanna worth to cut more bias strips. I did another layer on the outside of the embroidery hoop, gathering the ruffle only a little bit.

Then, since the hoop was STILL showing, I cut a few more bias strips and stitched down the center of them.

Gather those only a little bit, and glue on TOP of the embroidery hoop.


Now it was finally looking "full" as Mom always said. 

 I cut a long bias strip from some red fabric, made a bow, and hot glued it on since I couldn't find any red ribbon.

I wired this on top of my burlap wreath and hung it on my front door!


I love all the ruffly goodness, and how this project only cost me $2!

I hope you all have a safe and Wonderful Fourth!

Friday, January 14, 2011

Tissue paper wreath

When I was making my burlap wreath, I decided to try to do my own take on the coffee filter wreath that's so popular all over blogaritaville. Like Nester's or Middle Mama's .

But I LOVE coffee and was not about to sacrifice coffee filters to the cause. However, I did have a jumbo pack of white tissue paper I'd picked up for Christmas half off.

I used the outer hoop from my 12" embroidery hoop- the other half from the burlap wreath.
I cut several (like 10???) sheets of  tissue paper into 2" strips. Don't measure. You don't have to be precise. We are not preforming brain surgery here people.

So you will have a pile like this:


Using the same technique from my burlap wreath,  I pinched and glued lots of little strips until my wreath was nice and full.

Then, I flipped it over and used more glue to secure the strips over the hoop frame


I fluffed and trimmed the tissue paper to be full and pretty.


And then I hung her over my mantle with a pink ribbon.


But looking at the inspiration posts again, I may have to try Nester's coffee filter tree.

Thursday, January 13, 2011

Burlap Wreath Tutorial

I never got around to writing a tutorial for my Christmas wreath, especially due to the fact I was horribly remiss in not taking pictures as I was doing it.

So I bought another embroidery hoop, intending to do just enough to write the tutorial. Then the holidays came, and I forgot got busy.

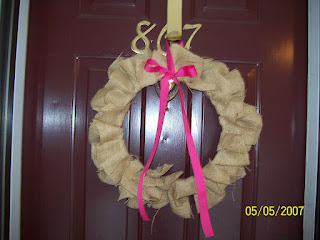
But now that I've taken down my Christmas decorations, my house was looking a bit lonely. So I broke out the glue gun again and make another burlap wreath for the front door. I didn't glue any decorations on this time, so I can change it with the seasons.

I love burlap, and not just because it's so "in". I love how burlap can transform a room, ground a high style, or gussy up some country. It can take so many forms, depending on how you treat it. Burlap also has great texture and is an awesome neutral.  It totally fits in my design aesthetic, so I use a lot of it.


So to make the wreath:

One 12" embroidery hoop
1/2 yard of burlap, cut into 8x4 rectangles
loads of hot glue

I used just one circle of the embroidery hoop for the wreath- it's just your circle form.


Take a rectangle of burlap, and pinch/ fold it together to make a "bow" shape.

Squeeze some hot glue on the top of your hoop, and stick the burlap on.


Continue doing this all the way around the wreath. Using a lot of rectangles close together will give you a fluffy wreath, less a shallower one.

Flip the whole thing over so the rectangles are on the bottom.

Using a load more hot glue, squeeze glue onto the exposed side of the hoop, allowing glue to drip onto the top of the hoop.  Fold the inner rectangles up and over, hiding the hoop. Secure with more hot glue as necessary.

You can then tie on bows or other embellishments, or glue them on  if you don't want to be able to change the look.


Here she is on my front door!

LinkWithin

Related Posts with Thumbnails